Enabling and Disabling Network Services
For security purposes, an administrator may need to stop one or more network services from accessing the Makito X1. From the Services page, you can enable and disable network services, including HTTP, SSH, Telnet, SNMP, RTSP, ONVIF, Haivision EMS, and Product Analytics. You can also enable bi-directional serial pass-through for controlling serially attached devices such as PTZ controlled cameras. Both RS-232 and RS422 are supported.
Important
In order to optimize your encoder’s performance, it is recommended that only the required network services be enabled. Please review the network services to make sure services used for your application are enabled or disabled as appropriate.
Caution
Take care not to disable all network services; you must at least keep http (Web interface), telnet, or ssh active. Otherwise you will lose access control to the unit, and the only way to re-enable these services is by a Factory Reset (For details, see Resetting the MX1 Rugged).
Click Settings on the sidebar and select the Services tab.
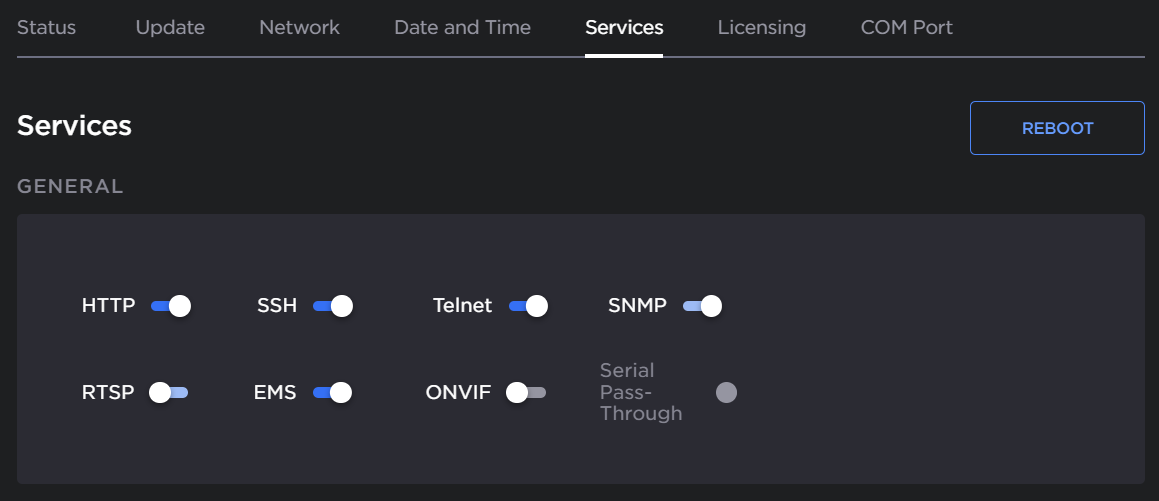
The Services page opens displaying the current status of network services. The following example shows the services of a Makito X1 encoder:
Note
The toggle color indicates the service status:
Color Indication Blue Service is operating.
Grey Service is disabled.
- To enable or disable a service, toggle the associated Service on or off. For details, see Services Settings.
- To pair the encoder with Haivision-EMS, toggle EMS on and Configure the EMS/Cloud Services settings (located on the Services page). For details, see Pairing the Decoder with Haivision EMS.
- To enable or disable the collection of anonymous product analytics, toggle Enable Anonymous Product Analytics on or off.

The service(s) will be stopped or started immediately. (You do not need to click Apply).
Tip
Network services can also be enabled/disabled using the CLI service command.
From the Services page you can also configure the Thumbnail Preview:
- Toggle the Thumbnail Preview feature on or off (this feature is on by default).

- If on, type the interval time, in seconds, in the Interval field.
- To apply your changes, click Apply.
Note
Preview Thumbnails appear on the Dashboard, Streams and Video Encoders pages to provide a visual reference of each video encoder's input. Preview Thumbnails can be enabled/disabled, and preview settings persist through reboot. By default, previews are enabled and set to 10 second intervals.
