Installing the StreamHub GO
Open the box, verify the contents, and visually inspect the items for any shipping damage. If necessary, contact Haivision for return instructions.
Unpack the box and position the hardware on a stable work surface.
Note
The StreamHub GO is an indoor appliance and should be kept in a dry, dust free environment.
Powering-up the StreamHub GO
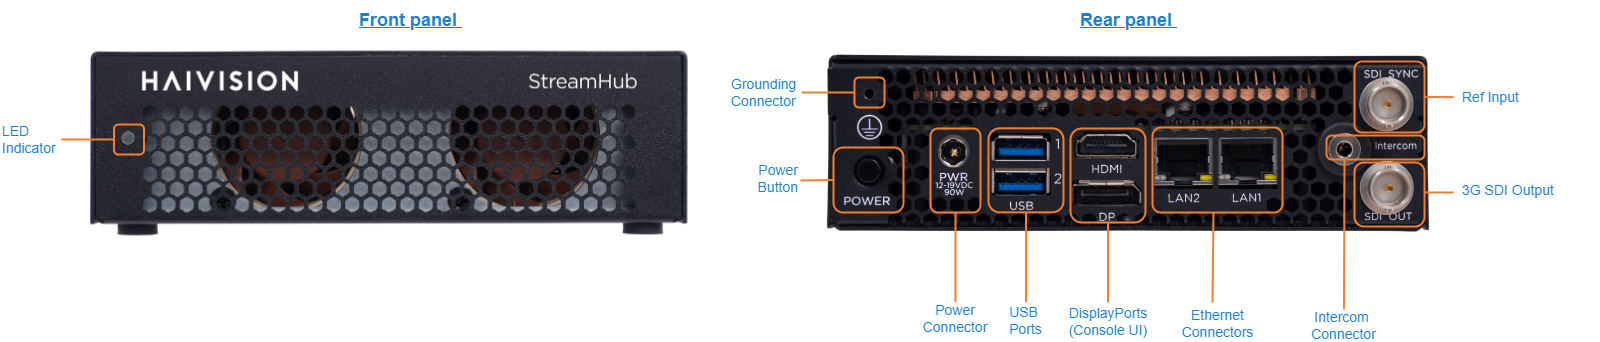
Plug the DC connector into the power connector at the rear of the unit.
Plug the power cord into the AC adapter.
Plug the cord into a grounded AC power source.
Press the power button to turn the server on.
Power LED Indications | |
|---|---|
GREEN | StreamHub GO is On. |
OFF | StreamHub GO is Off. |
Power button Usage | |
Soft Shutdown | Depress Power button. |
Hard Shutdown | Depress Power button and hold for 4 seconds. |
Accessing the settings menu
You have two possibilities to access the Settings menu:
Using the SSH connection
Connecting a screen and a monitor directly to the server.
Choose a method appropriate to your needs.
Important
Prior to this connection:
Ensure that the ssh service is enabled (please refer to https://doc.haivision.com/StreamHub/4.4/configuring-security-settings).
You have the IP address of the server if connecting to the server on the same LAN.
To access the server's Settings menu through ssh connection, you have two options:
Static IP – Connecting the computer directly to the server using the Ethernet port 2. In this case, both the server and the computer have a static IP address.
LAN (DHCP) – Connecting the computer and the server to the same LAN. In this case, the network interfaces of both the server and the computer are configured on DHCP (server's Ethernet 1 interface default configuration). You need to know the IP address of the server.
Choose the appropriate method below:
Static IP Address
Using Static IP addresses to access the server's Settings menu:
Plug an Ethernet cable from one of the Ethernet interface of the server configured with a static IP address to a computer.
Set the computer IP address to the IP: 192.168.10.200.
Open PuTTY or Tera Term on the computer or another
sshclient application (MAC and Unix operating systems usually include ansshterminal).In the Host box, enter the static IP address of the server: 192.168.10.11
In the Port box, enter 5322.
For the connection type (or service), tick ssh.
Click the Open (or OK) button.
Log in to the server to view the server's Settings Menu.
Login : config
Password: password as defined during the installation
Note
On a newly delivered unit, the password is defined by Haivision and provided on a label stuck under the device.
LAN (DHCP)
Using LAN (DHCP) to access the server's Settings menu:
Open PuTTY or Tera Term on the computer or another
sshclient application (MAC and Unix operating systems usually include ansshterminal).In the Host box, type the server IP address.
In the Port box, enter 5322.
For the connection type (or service), tick ssh.
Click the Open (or OK) button.
Log in to the server to view the server's Settings Menu.
Login : config
Password: password as defined during the installation
Note
On a newly delivered unit, the password is defined by Haivision and provided on a label stuck under the device.
Plug a VGA display monitor to the server.
Plug a keyboard to an USB interface.
Power ON the server.
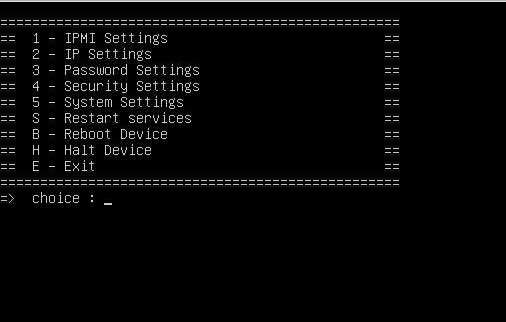
When the server prompts you, log in to the server to view the server's Settings Menu.
Note
On a newly delivered unit, the password is defined by Haivision and provided on a label stuck under the device.
Use the arrow keys to select IP Settings menu.